
This part of my class gets so many people excited and they always want to know if I have more information, so here we go! Let’s start with a blank PDF. If you have a document that you want to turn into your own customized form, then these tips will make you very happy, especially the “OCD and willing to admit it students”. I’m going to be giving you tips from both the PC and MAC users so look for the one that applies to your type of computer.
Load your document in your loop or templates, “drag and drop” is my favorite way to put a PDF in the loop. For this we are going to add a lead based paint document in the loop. Now that you have a document, open it. At the top you will see “add” and you have several things you can add to a document. Many of these items share the same properties and options for shortcuts. Let’s start by adding some initials. After you click on “add initial” at the top, you notice that it follows your curser. Put the TOP LEFT corner in the place you want it to be. When editing using these shortcuts, the top left is the fixed point and the bottom right is where they will move from.
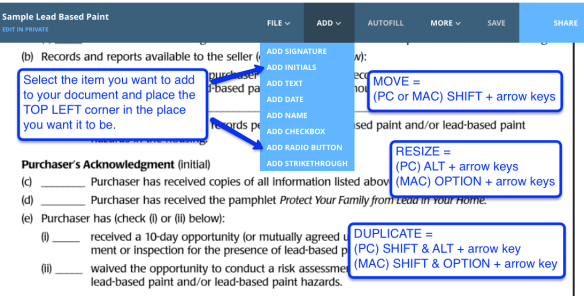
To MOVE the field added, hold your SHIFT KEY down and then select the arrows to move the direction you want to move the box to. If you press the right arrow key it will move the box right, if you press the down arrow, it will move the box down and so on.
To RESIZE you will want to hold the ALT KEY on a PC/OPTION KEY on a MAC and then move the arrows away from the top left to make it larger or toward it to make it smaller. For example if you want to make it smaller, then you will need to hold the ALT KEY/OPTION KEY and push the left or up arrow. To make it larger would go the opposite direction, by holding down the ALT KEY/OPTION KEY to the right and down.
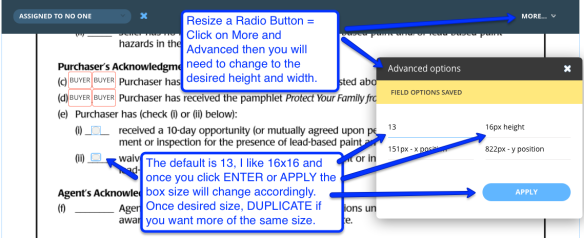
Another option for resizing is best used for a “radio button” but can be used for many fields. If you have clicked on or if an item is highlighted, you will see at the top right the “more” and when you click on it you will see the “advanced” and once selected will it will open a new box and display the exact pixels for the field highlighted. You can alter the size of the item be changing the pixel number to higher to increase the size and lower to make it smaller. You have the options of the X and Y axis which is hight and width. The radio button is the one button that does not have the arrow to increase or decrease the size with the mouse and this allows your to still resize it.
To DUPLICATE you will combine buttons and hold both the SHIFT AND ALT KEY/OPTION KEY and then push the arrow in the direction you want to duplicate it to. If you have placed an initial box, then resized it to the correct proportions and need another one exactly like it, then use this tip to duplicate another one.
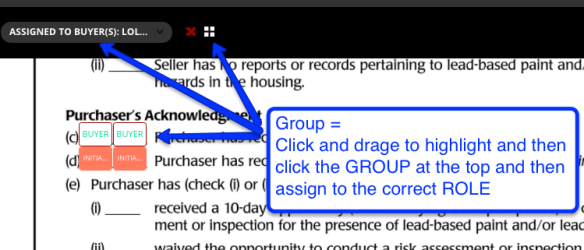
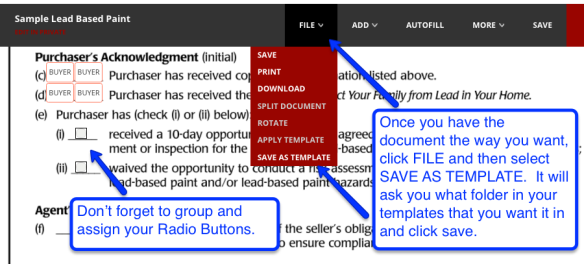
A lot of times we need to have more than one client initial or sign so a great way to prepare a form to be used for either 1 or 2 buyers then you will want to GROUP. This is very easy to do and extremely helpful. Once you have put the initials, signatures or radio buttons on the page, you will need to “click and drag” over each of the items you want to group. You will notice that they will be highlighted and at the top of the screen (in the menu area next to “assign”) you will see 4 squares (either red or blue) and then when you hover over it you will see the word GROUP above it. Once you click it, they will be grouped together and will show white with the word UNGROUP above it, signaling they are already grouped together. Once you have them grouped accordingly, you will need to also ASSIGN it to the ROLE that you want to be the one to sign or select it. What this does is makes it so that you can only have 1 of the items grouped together initialed, signed or selected by each person. For example, if you have 3 items you have “grouped” then only one can be selected or if you have 2 initial boxes grouped then if they are assigned to a buyer then only 1 buyer can initial in each of the group. They can not initial both, it’s what I call “client proof”. Very helpful for setting up templates and not wanting to duplicate efforts.
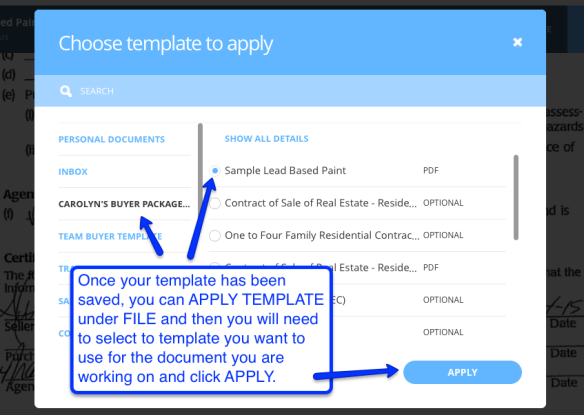
When you get the document the way you want it AND you want to use this as a template again, then under “file” at the top you will see an option that says SAVE AS TEMPLATE. Then it will ask you about saving your work and I would say “yes” and then you will be prompted to select a place to save the template. It will only allow you to put this in one of your folders in your templates and not in an office template so if you don’t have a custom folder created in your templates, you may want to do that first. Now that your template is created, you can use this on other documents over and over.
APPLY TEMPLATE is how you use the template that you just created. Open a document that you want to apply a template to and click the “file” and APPLY TEMPLATE, then select the template you want to use. This can also be used if you have an updated document that needs to be slightly edited. For example, your real estate commission or association puts out an updated version of a form already in Dotloop. You have it as a PDF from the commission or association and load it into your loop or templates and then APPLY TEMPLATE and select the older version to layer over all of the fields from the old form onto the new one. Then you can adjust the boxes as needed to be in the right place sets for the new version of the document.
 One thing to note is that in order to save the templates and apply the templates, you will need to have Dotloop Premium. If you are not a Premium user, you will need to upgrade in order to use these two features. If you want to know all of the custom features and everything that you can do for all of the shortcuts, they are called “Hot Keys” and this is a link to the Dotloop support page with Hot Keys.
Two more tips: COPY and PASTE which are also shown on the bottom right of your screen when you are in a document, but here is how to use them. First to COPY you will select or click on the item(s) you want to copy and then push these buttons on your keyboard together once: PC – CONTROL+SHIFT+C or MAC – COMAND+SHIFT+C and then click somewhere else on the screen or page you want to past them on and click all together once: PC – CONTROL+SHIFT+V or MAC – COMAND+SHIFT+V. Then it will follow your curser and when you click, it will past the item you copied where ever you click and if you hold your SHIFT key down, it will allow you to past it multiple times until you let go of the SHIFT key.
I hope you enjoy these tips on Editing Heaven. If you would like to have me come to your office to show you even more tips and tricks, complete the information below to get the ball rolling! You never know what state I will be in. I have trained in 34 states now and have 17 left to go (including D.C. as one of the places I have trained). If you are in one of the 17, I’m ready to come your way!!
I can be reached at CarolynTechPertise@gmail.com, by phone or text at 918-951-9020 or visit my real estate website at http://www.SearchTulsaHouses.com. For technology training or consulting assistance visit http://www.iCarolyn.com.
